Why the photo order in your exposé matters (more than most sellers think)
If you’re wondering welche Reihenfolge für Bilder im Exposé die beste ist, you’re already ahead of many listings. The best order for images in real estate exposé isn’t just a cosmetic detail—it’s a conversion lever. Buyers don’t “study” a listing like a brochure; they skim, tap, and decide within seconds whether the property is worth a deeper look. Real Estate Photography Tips
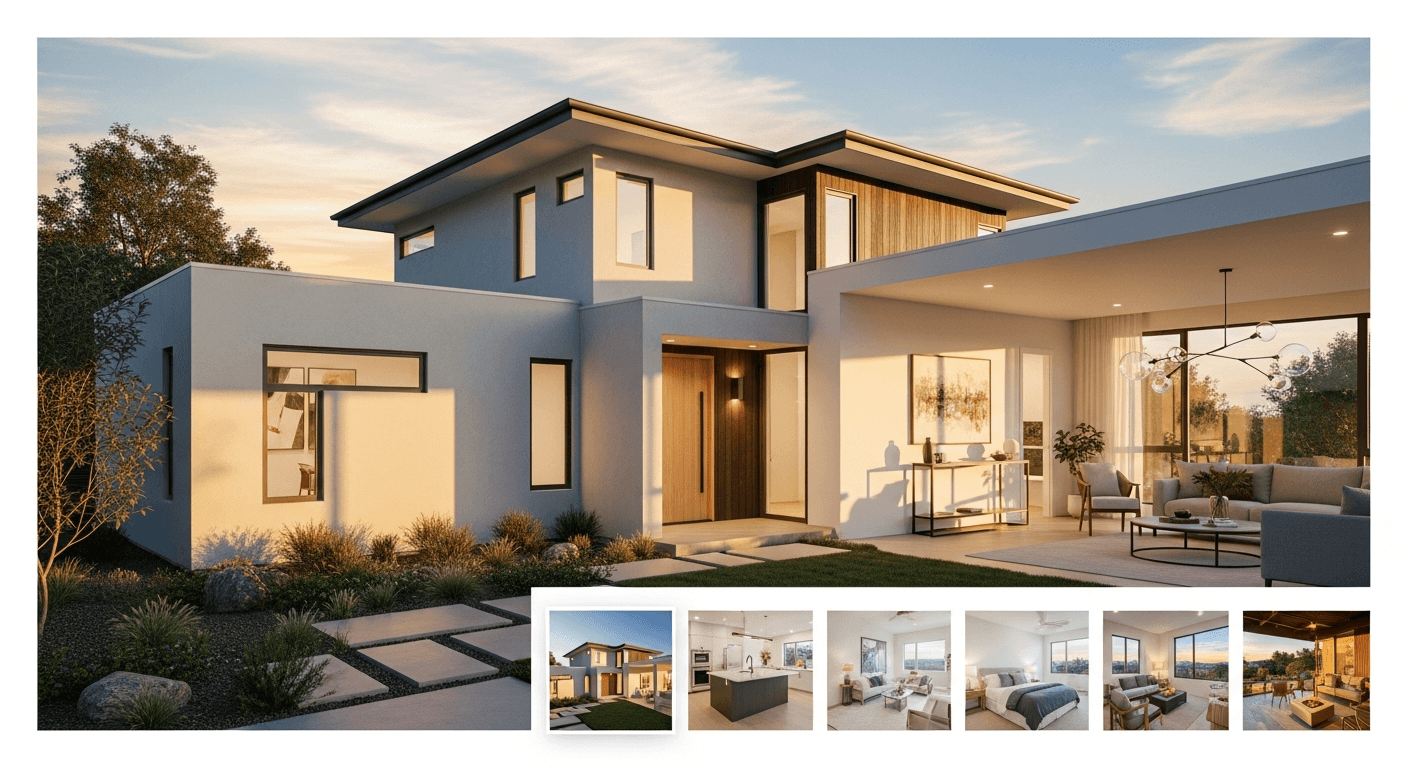
A strong property listing photo sequence creates momentum: it answers the buyer’s questions in the same order they naturally arise—What does it look like from outside? How do I enter? Where do I live day-to-day? Where do I sleep? What’s special here?—and it mimics a mini virtual tour without requiring expensive production.
Multiple industry guides emphasize that photos are among the most influential elements in listing performance, and that presentation choices (including sequencing) affect engagement and perception. For deeper background, compare guidance from Zillow’s best practices for listing photos, Realtor.com photo tips, and NAR’s photo tips for listings.
The proven “mini-tour” flow: the optimal photo sequence for property listings
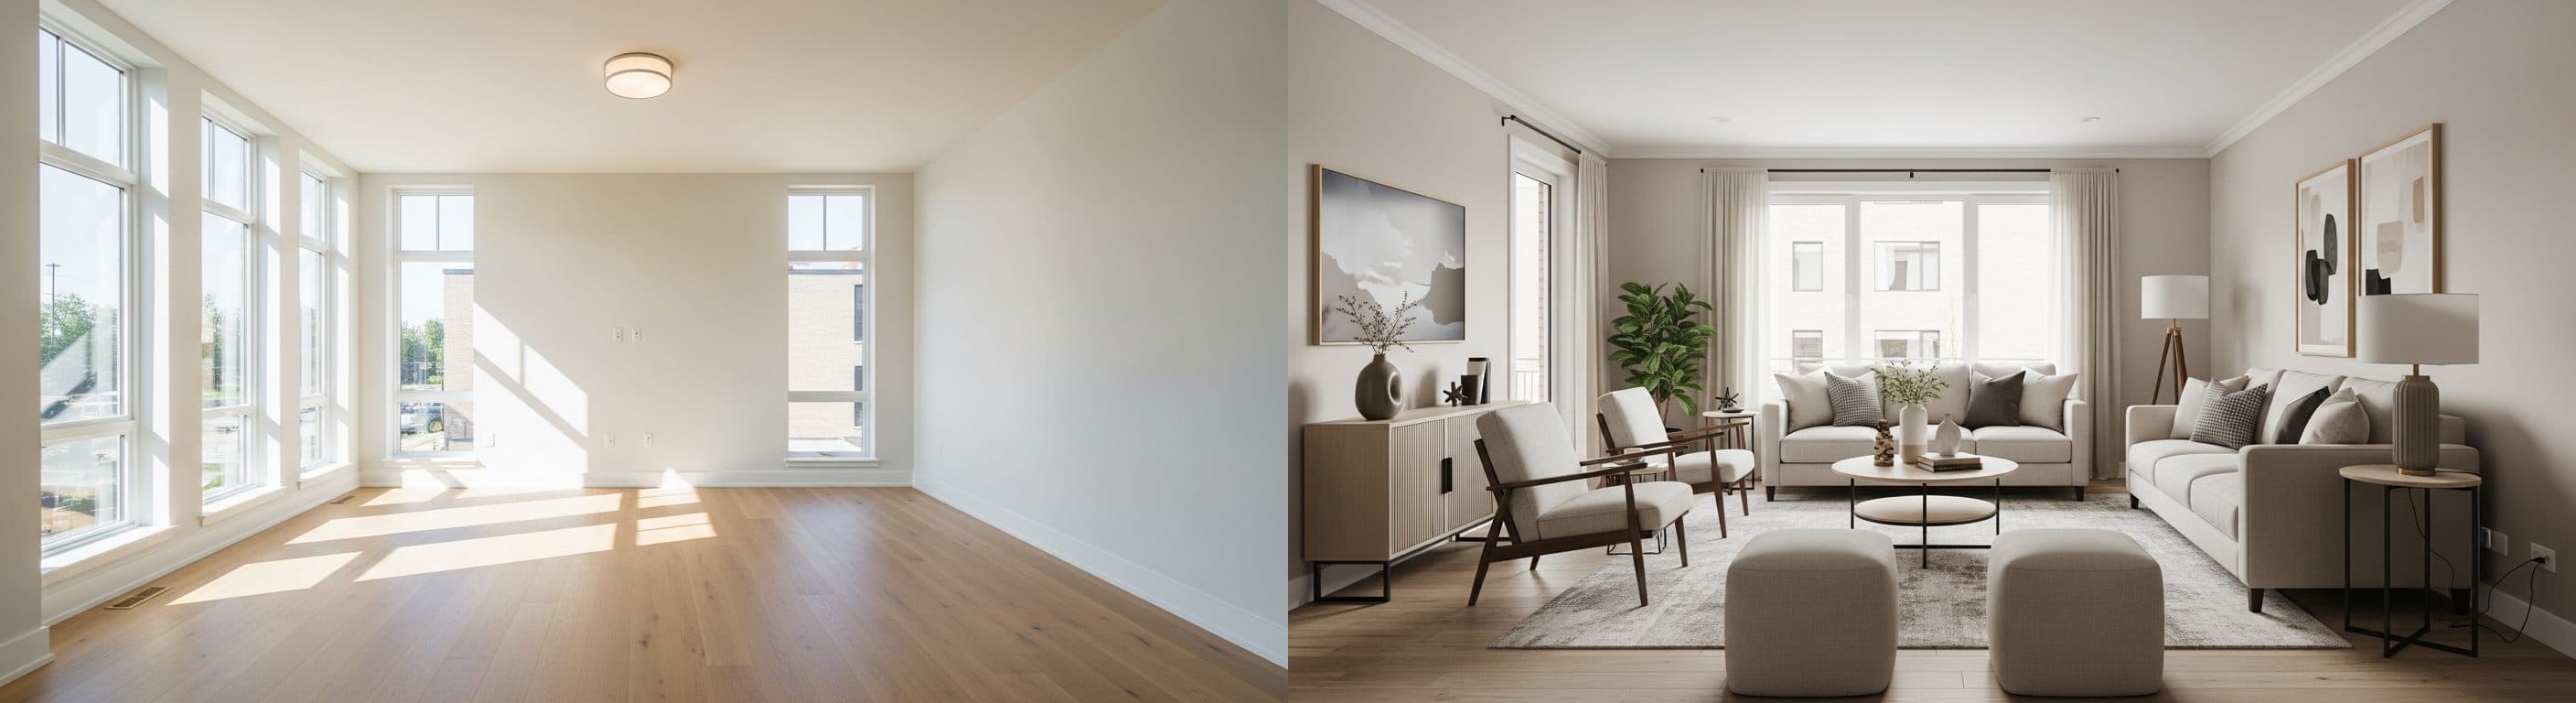
Sell faster with better listing photos
Virtual staging helps buyers visualize the space. Try HomestagingKI free: 2 images included.
The most reliable optimal photo sequence for property listing is a logical walk-through. Think of it as guiding someone who has never been there—front to back, public to private, everyday to special.
The 10–15 image rule (a quick win for engagement and budget)
A common mistake is uploading everything: 35 near-identical angles, duplicates, and “filler” photos. Instead, aim for 10–15 high-quality images that tell a complete story. This keeps attention high, reduces editing time, and is ideal for private sellers working on a tight budget.
- Agents: fewer, stronger images reduce buyer fatigue and improve inquiry quality.
- Private sellers: less time shooting + less time choosing + less time uploading.
- Developers: a consistent 10–15 frame template makes portfolios look premium and standardized.
The best way to organize pictures in a home exposé (the core checklist)
Try HomestagingKI for free
Upload a room photo and get a staged version in minutes. No furniture logistics, no waiting.
Use this real estate photo order checklist as your default. It’s simple, fast, and works across apartments, houses, and new builds.
| # | Image type | Goal | Pro tip (budget-friendly) |
|---|---|---|---|
| 1 | Curb appeal / exterior hero (front) | Stop the scroll; create trust and context | Shoot in natural light; straighten vertical lines in a free editor |
| 2 | Entryway / hallway | Show how the home “begins” and the flow starts | Open interior doors to suggest openness; remove shoes/coats |
| 3 | Living room (widest, brightest angle) | Sell lifestyle; show space and light | Stand in a corner; keep camera level; avoid heavy zoom |
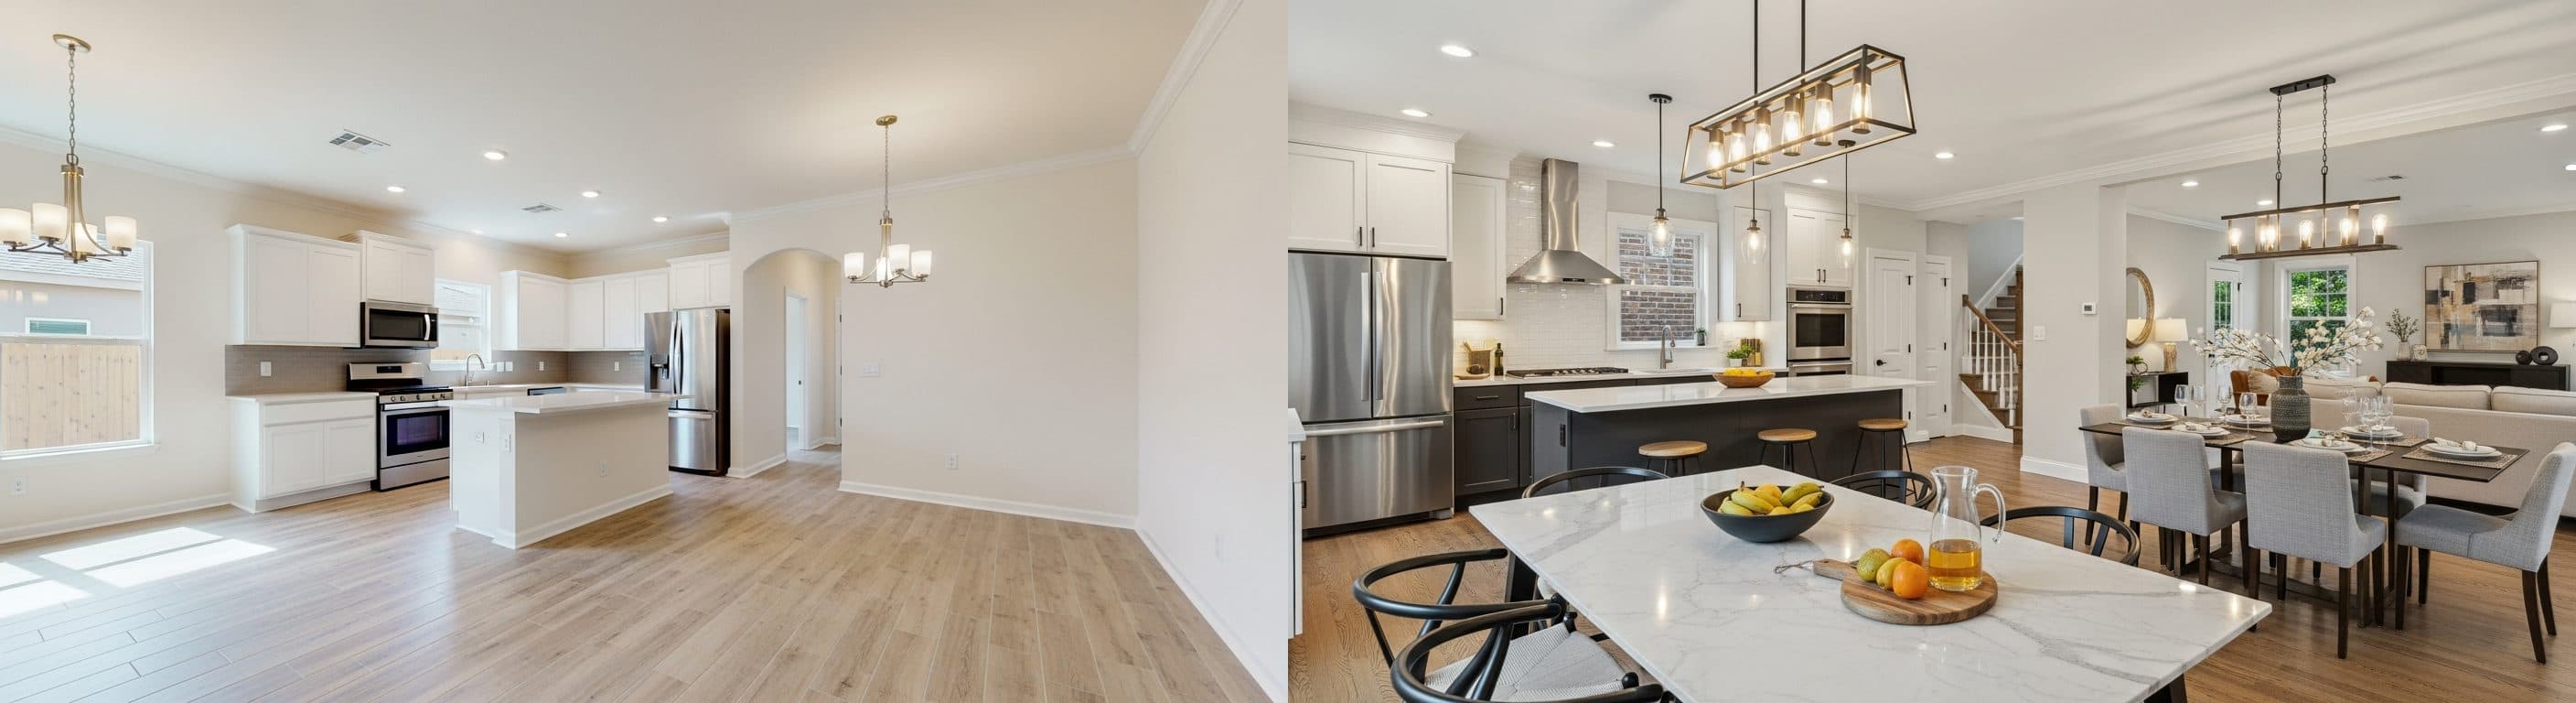
| 4 | Kitchen (clean counters) | Confirm functionality and value | Hide dish soap, sponges, bins; turn on under-cabinet lights |
| 5 | Dining area (if separate) or living/dining connection | Show how entertaining works | One strong angle is enough—avoid duplicates |
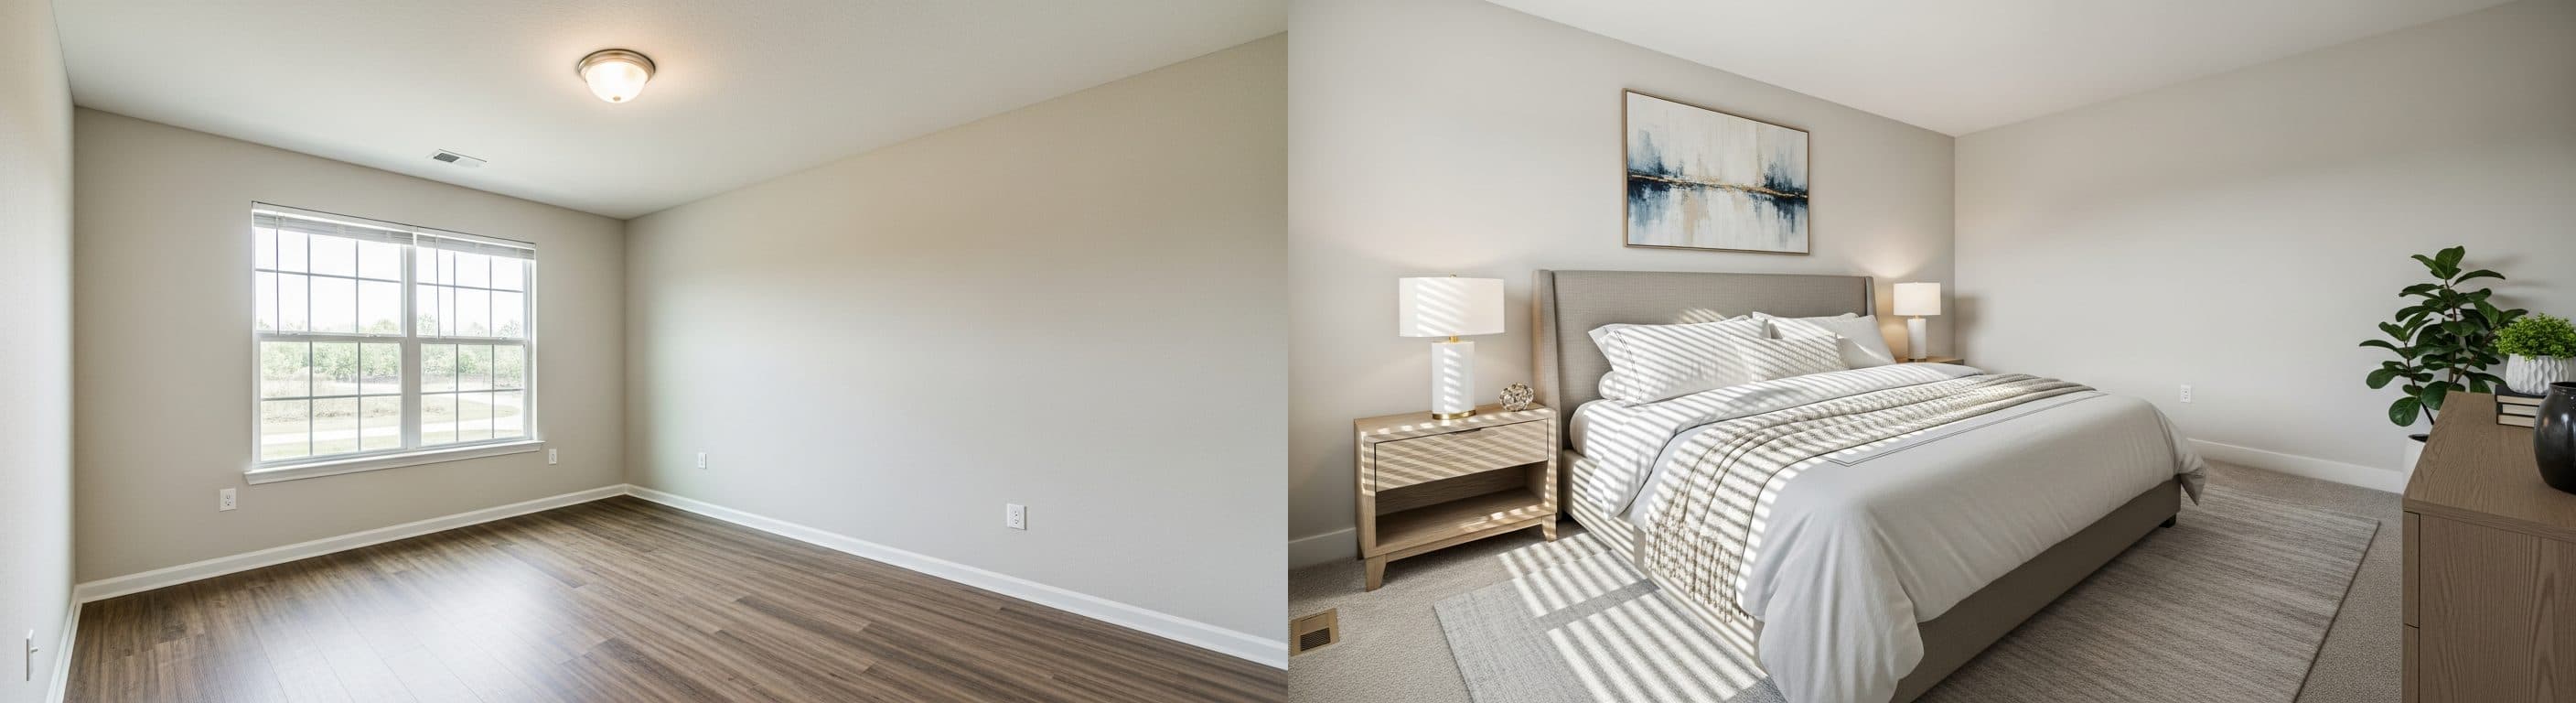
| 6 | Primary bedroom | Signal comfort and privacy | Make the bed hotel-neat; clear nightstands |
| 7 | Additional bedroom / office (best one) | Show flexibility (kids, guests, work-from-home) | Stage as office if that’s your target audience |
| 8 | Bathroom (best bathroom first) | Confirm cleanliness and condition | Close toilet lid; remove toiletries; add a clean towel |
| 9 | Second bathroom / guest WC (if relevant) | Reduce uncertainty (“How many baths?”) | One angle; avoid mirror reflections of the photographer |
| 10 | Balcony / terrace / backyard (best outdoor feature) | Add emotion; expand perceived living area | Shoot when it’s bright; add a chair/plant for scale |
| 11 | Special features (fireplace, view, built-ins, sauna, elevator, garage) | Differentiate and justify price | Use one close-up + one contextual shot if truly unique |
| 12 | Floor plan / site plan (if available) | Make the layout “click” | Place after key rooms so buyers can map what they saw |
| 13 | Lifestyle closer (patio at sunset, view, cozy corner) | End on emotion; increase saves/shares | Warm color temperature; keep it realistic |
Image arrangement tips for home sellers: how to choose the “first five” when you’re not a pro
Private sellers often say: “I don’t have professional photos.” You don’t need them to apply smart image arrangement tips for home sellers. The biggest wins come from (1) choosing the right rooms, (2) shooting in natural light, and (3) ordering images so the listing feels easy to understand.
The “first five” sequence that works for most homes
Before & After that gets clicks
Photorealistic virtual staging for agents and private sellers—optimized for portals and social ads.
- Exterior curb appeal (or best building façade for apartments)
- Living room (brightest, widest angle)
- Kitchen (clean, functional, inviting)
- Primary bedroom (calm, tidy, neutral)
- Outdoor space or best unique feature (balcony, view, garden, fireplace)
This is the fastest path to a credible optimal photo arrangement in real estate brochures and online exposés—especially if you’re selling privately and want to keep costs low.
Budget-friendly photo tips for private sellers (smartphone edition)
If you’re doing photo sequencing for selling house privately, you can dramatically improve results with a few low-effort steps before you even think about ordering.
- Shoot in daylight: turn off harsh ceiling lights if they create yellow/green color casts.
- Clean the lens: a quick wipe often beats any “pro” filter.
- Use 0.5x (ultra-wide) carefully: keep the phone level to avoid distorted walls.
- Avoid mirrors: step aside or crop to remove your reflection.
- Declutter aggressively: fewer objects = larger-looking rooms.
- Take 2–3 angles per key room, then pick only the best one for the exposé.
For broader shooting guidance, see HomeLight’s photography tips, Redfin’s real estate photography guide, and Bankrate’s overview of best real estate photos.
Objection handling: “Order doesn’t matter” (it does—because attention is fragile)
Need better photos for your listing?
Convert empty rooms into warm, modern interiors. Increase engagement and reduce time on market.
The objection “order doesn’t matter” usually comes from treating photos like a gallery. But a listing is closer to a sales funnel: the first images decide whether viewers continue. Marketing and industry commentary repeatedly highlight that the way you present information affects engagement and perceived quality—photo order is part of that presentation layer.
If you want a deeper dive into sequencing logic, compare perspectives from Inman on the perfect listing photo sequence, Forbes on the importance of photo order, and the practical examples in StageMyHouse on photo order.
Virtual staging image order: where “before/after” belongs (and where it doesn’t)
Virtual staging can be a major advantage—especially for empty properties, new builds, or sellers who can’t invest in physical staging. But the virtual staging image order matters as much as the staging itself.
Recommended: staged images first, before images later (or grouped)
If you include both versions, lead with the best-looking (staged) image in the main sequence, and place the “before” version later—either right after the staged one (as a pair) or in a dedicated “Renovation/Condition” section. This keeps the main narrative aspirational while staying transparent.
For more on staging workflows and ordering, see virtual staging image order best practices and developer-focused sequencing ideas like BoxBrownie’s photo sequencing for developers.
HomestagingKI quick win: reorder first, then stage
If time is tight, do this in the fastest order: (1) pick the 10–15 images you’ll actually use, (2) reorder them into the mini-tour flow, (3) then apply virtual staging to the 2–6 images that matter most (usually living room, kitchen, primary bedroom, and one outdoor/lifestyle shot).
Want to test it quickly? HomestagingKI offers 2 images free and fast online results—ideal for a staged hero image at the top of your exposé. See options here: HomestagingKI pricing & free start.
Standardized image flow for property developers: scale exposés with consistent branding
For developers and teams managing multiple units, the goal isn’t only “a good listing”—it’s repeatable output. A standardized image flow for property developers improves brand consistency, reduces production time, and makes it easier to compare units fairly.
A scalable template (same order, every time)
| Template slot | What to show | Why it scales |
|---|---|---|
| 1 | Project exterior / entrance / signage | Instant project recognition across portals |
| 2 | Lobby / common area (if applicable) | Signals quality and maintenance standards |
| 3 | Unit living area (hero) | Comparable across units; best for virtual staging |
| 4 | Kitchen | Spec confirmation (materials, appliances) |
| 5 | Primary bedroom | Comfort + size benchmark |
| 6 | Bathroom (best) | Finish quality benchmark |
| 7 | Balcony / view / terrace | Emotional differentiator |
| 8 | Storage / utility / parking (if relevant) | Removes buyer uncertainty |
| 9 | Floor plan | Fast comprehension; fewer repetitive questions |
| 10 | Location/lifestyle image (optional) | Brand story; supports premium positioning |
This approach supports scaling real estate exposés with consistent branding. For more on standardization and marketing consistency, explore standardizing listing images and brand consistency guidance like consistency in property exposés.
Speed up property marketing with image order best practices (team workflow)
- Define a naming convention: 01_Exterior, 02_Entry, 03_Living, etc.
- Create a shared “approved angles” library for each unit type.
- Use the same crop ratio and color profile across all listings.
- Stage the same slots (e.g., Living + Bedroom) for every unit to keep output consistent.
- QA checklist before publishing: duplicates removed, order correct, mobile-first preview checked.
If you’re building a high-throughput system, tools and guides around sequencing and templates can help, such as exposé builder software and workflow thinking from speed and scale in virtual staging.
Room-by-room sequencing rules (so you never get stuck again)
Below are practical real estate image sequencing tips you can apply to almost any property type.
Exterior shots: start wide, then add context
- First image: the most appealing exterior angle (front or best façade).
- Second exterior (optional): driveway/parking or garden if it’s a major selling point.
- Avoid: showing construction clutter, bins, or dark rainy shots early.
If you need more exterior-specific guidance, compare tips from Rocket Mortgage on why photos matter and the practical do/don’t framing advice in Houzz photography dos and don’ts.
Living areas: lead with the brightest, widest, cleanest angle
Your living room photo is often the most important interior shot. Put it early (usually #3) because it sells day-to-day life. If you have two living spaces, show the primary one first, then the secondary (but only if it’s clearly different).
Kitchen: one strong photo beats three average ones
Kitchens are high-stakes. Keep it early, keep it clean, and keep it honest. If the kitchen is small, show a single angle that explains layout (sink + cooktop or L-shape), then move on.
Bedrooms and bathrooms: privacy later, best first
- Show the primary bedroom before secondary rooms.
- Show the best bathroom first (newer finishes, more light).
- If a bathroom is very small, consider a clean detail shot (vanity + mirror) instead of a distorted wide angle.
Special features: only if they truly differentiate
Special features (view, fireplace, sauna, workshop, wine cellar) should come after the core rooms so they feel like “bonus value,” not confusing context. This is a key part of the best way to organize pictures in home exposé.
Mobile-first ordering: most buyers view exposés on phones
A practical checklist item many people miss: ensure your order works on mobile. On a phone, buyers see fewer thumbnails and swipe quickly—so the first 3–5 images do most of the selling.
- Make image #1 unmistakable (exterior hero or best façade).
- Ensure image #2 and #3 are “big rooms” (entry + living).
- Avoid tiny rooms (guest WC, storage) in the first five.
- Check how portals crop thumbnails; avoid key details near the edges.
Real estate photo order checklist (copy/paste for your next exposé)
Use this as your quick, under-one-hour preparation system. It’s designed to reduce decision fatigue and make the best order for images in real estate exposé repeatable.
- Pick 10–15 images maximum (delete duplicates).
- Start with curb appeal (best exterior).
- Add entryway/hallway to establish flow.
- Place living room and kitchen next (decision rooms).
- Then primary bedroom, then secondary bedroom/office.
- Bathrooms after bedrooms (best bathroom first).
- Outdoor space next (balcony/terrace/garden).
- Add special features (view, fireplace, garage) only if meaningful.
- Add floor plan near the end (after the visual tour).
- Close with a lifestyle/emotional image (sunset patio, view).
- Do a mobile preview: first five images must be strong.
- If using virtual staging: staged version earlier, before version later or paired.
YouTube: see photo sequencing examples (walkthrough-style)
If you prefer to learn visually, here’s a video that demonstrates how to arrange listing photos into a logical flow.
Home Staging vs Virtual Staging How Does It Affect the Real Estate Sale?
Common sequencing scenarios (and the best order for each)
Scenario A: Small apartment with no balcony
- Building exterior / entrance
- Entry/hallway
- Living/sleeping area (hero)
- Kitchenette or kitchen
- Bathroom
- Storage/utility (only if it’s a plus)
- Floor plan
- Neighborhood/lifestyle (optional)
Scenario B: Family house with garden
- Front exterior (hero)
- Backyard teaser (optional if stunning)
- Entryway
- Living room
- Kitchen
- Dining area
- Primary bedroom
- Kids/guest room
- Bathroom
- Guest WC (optional)
- Garden/terrace (full)
- Garage/workshop (if valuable)
- Floor plan
- Lifestyle closer (patio at golden hour)
Scenario C: New build / developer unit (staged digitally)
- Project exterior / entrance
- Unit living area (virtually staged hero)
- Kitchen (virtually staged or clean render/photo)
- Primary bedroom (virtually staged)
- Bathroom (clean, bright)
- Balcony/view
- Amenities (gym, lobby, parking) if applicable
- Floor plan
- Location/lifestyle image
- Optional: “before” images or construction progress at the end
Internal linking ideas for HomestagingKI (use these to build topical authority)
To strengthen SEO and guide readers toward action, link from this article to related pages and guides on your site. Start with the main conversion page: HomestagingKI pricing (2 images free). Then add supporting content such as virtual staging FAQs, before/after galleries, and room-specific staging tips.
FAQ: Best order for images in a real estate exposé
FAQ
What is the best order for images in a real estate exposé?
Use a mini-tour flow: exterior curb appeal first, then entryway, living room, kitchen, primary bedroom, bathrooms, outdoor spaces, special features, floor plan, and finish with an emotional lifestyle image.
How many photos should an exposé include?
For most listings, 10–15 strong images are enough. This avoids overwhelming buyers and makes your listing feel curated and professional.
Where should I place virtual staging images in the order?
Place the virtually staged version early (where that room appears in the tour). If you include “before” images, put them later or pair them directly after the staged image so the main story remains aspirational but transparent.
What if my exterior photo looks weak (bad weather, busy street)?
Still start with the best available exterior/context shot, but choose the cleanest angle and best light. Then immediately follow with your strongest interior hero (usually the living room) to regain momentum.
Does photo order matter even if the photos are not professional?
Yes. Good sequencing can make smartphone photos feel clearer and more trustworthy because buyers understand the layout and key selling points faster.
Sources and further reading
Sources
- Best Practices for Real Estate Photos (article)
- Real Estate Photo Tips for Sellers (guide)
- Real Estate Photography Tips (article)
- Perfect Listing Photo Sequence (article)
- Photo Tips for Real Estate Listings (article)
- Guide to Real Estate Photography (guide)
- Importance of Photo Order in Listings (article)
- Real Estate Photography Dos and Don'ts (article)
- Best Real Estate Photos for Selling (article)
- Best Practices for Image Order in Virtual Staging (article)
- Photo Sequencing for Property Developers (article)
- The Best Order for Property Photos in Listings (article)
- Home Staging vs Virtual Staging How Does It Affect the Real Estate Sale? (youtube_placeholder)