Homestaging KI
Homeowner using smartphone to photograph a well-staged living room with natural light
HomestagingKI Team
12/16/2025
12 min read

Real Estate Photography Checklist for Homeowners: DIY Tips to Sell Faster

Discover a comprehensive real estate photography checklist for homeowners looking to take DIY property photos. Learn tips to improve listing photos, boost CTR, reduce time on market, and enhance ROI with budget-friendly strategies, virtual staging insights, and common mistake avoidance.

V1
real estate photography
DIY property photos
home staging tips
property selling guide
virtual staging
In the competitive world of real estate, first impressions matter immensely. For homeowners, real estate agents, and developers, high-quality photos can make or break a listing. This guide provides a detailed real estate photography checklist for homeowners to help you capture stunning DIY property photos that attract more buyers, increase listing CTR, and ultimately lead to faster sales and better ROI. NAR Report on Real Estate Photography
Whether you're a private seller aiming to save on professional photography costs or a real estate agent advising clients, following this checklist ensures your photos stand out. We'll cover everything from preparation tips to post-processing, incorporating insights on virtual staging and how it amplifies photo quality. DIY Real Estate Photography Tips for Homeowners

Why High-Quality DIY Photos Matter for Homeowners

High-quality DIY photos by homeowners can increase listing CTR by up to 200%, leading to more inquiries and higher lead quality, as per Zillow studies. Properties with professional-level photos sell 32% faster, reducing time on market and improving ROI for sellers, according to Redfin data. Real Estate Photo Checklist for Sellers
A comprehensive photo checklist helps homeowners avoid common pitfalls like poor lighting, which can deter 40% of potential buyers from clicking on listings. Integrating virtual staging with homeowner-taken photos can boost perceived value, resulting in 20-30% higher offers and better ROI. Real Estate Photography Tips to Sell Faster
Real estate agents report that listings with high-quality images generate 61% more leads, with improved lead quality due to serious buyer engagement. Time on market decreases by an average of 21 days for homes with optimized photos, directly impacting carrying costs and overall profitability. The ROI of High-Quality Real Estate Photos
Homeowners using a photo checklist see a 15% increase in online views, correlating with higher CTR and faster sales cycles. Studies show that decluttered and well-lit photos can enhance lead quality by attracting more qualified buyers, reducing tire-kicker inquiries. Photography Checklist for Selling Your Home
ROI from better photography is evident in a 10-15% price premium for homes that appear move-in ready in listings. Agents advising on DIY photo checklists report shorter market times and higher client satisfaction, fostering repeat business. Tips for Better Real Estate Listing Photos

Essential Preparation: Declutter and Clean Every Room

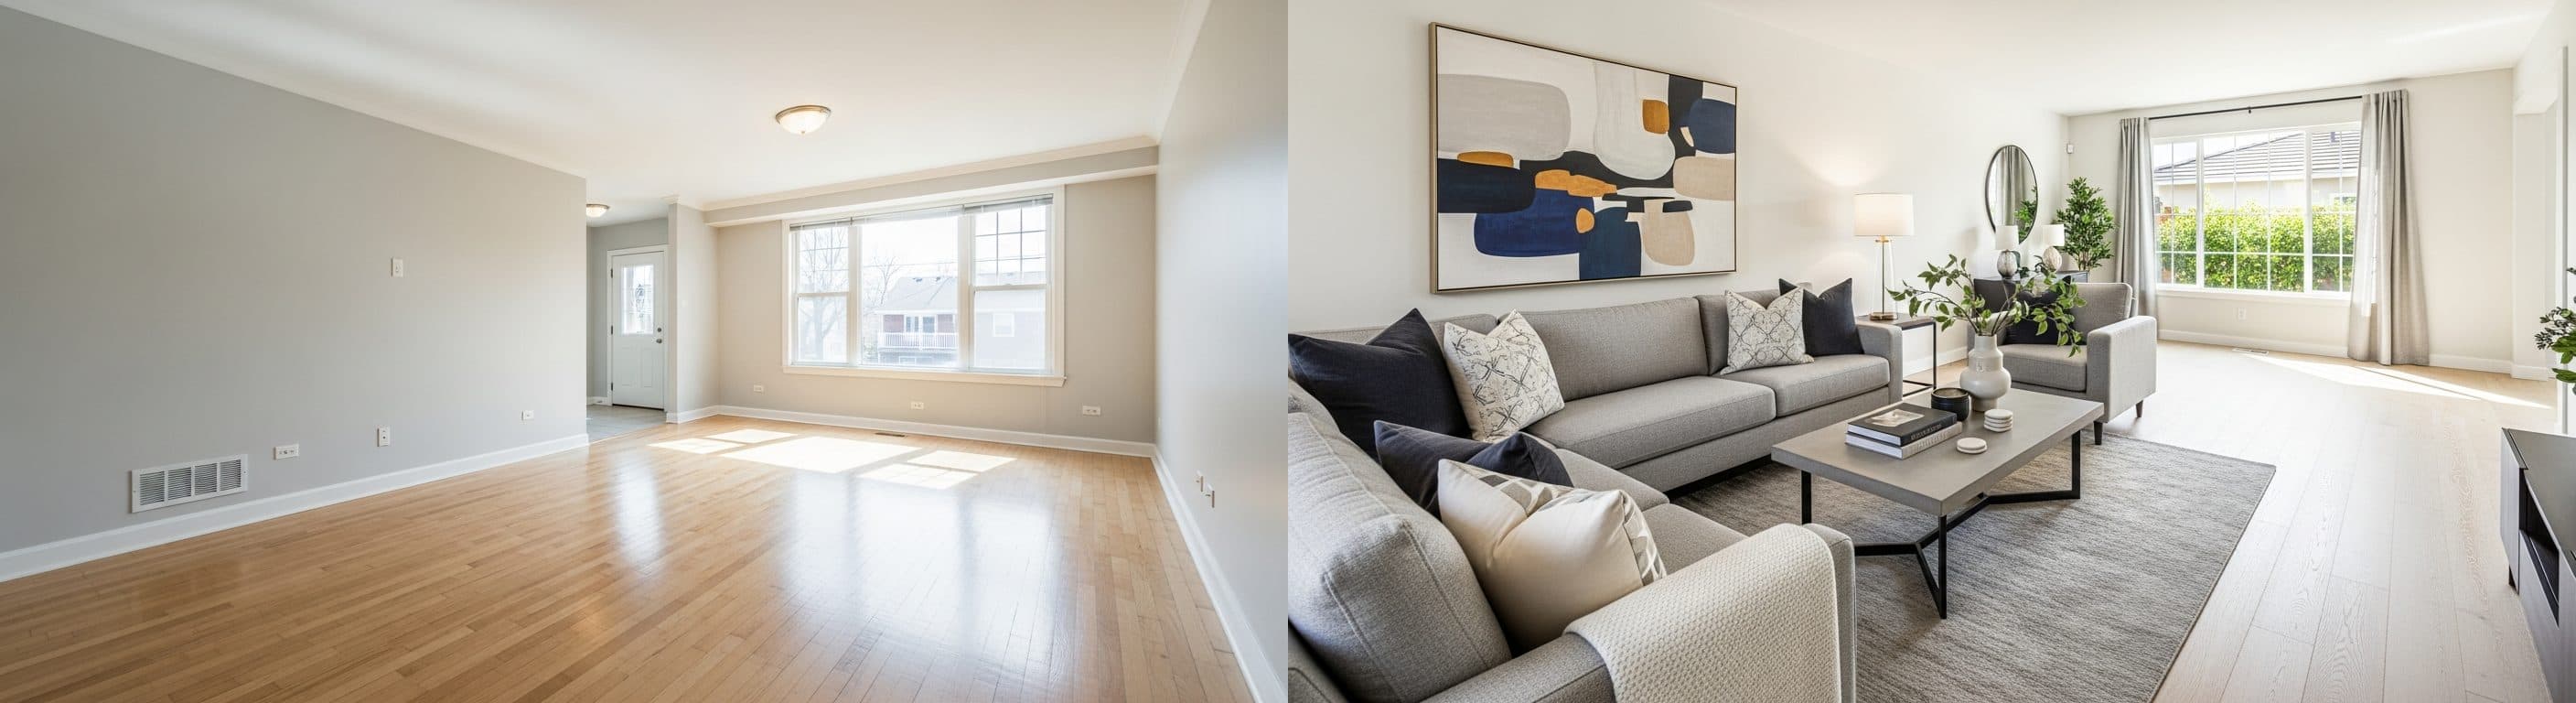
Sell faster with better listing photos

Virtual staging helps buyers visualize the space. Try HomestagingKI free: 2 images included.

Start free
Declutter and clean every room thoroughly before photographing to create an appealing, spacious look without spending money. This is a foundational step in any homeowner real estate photo guide. Home Selling Photography Checklist
  • Remove personal items like family photos and knick-knacks to help buyers envision themselves in the space.
  • Wipe down surfaces, vacuum floors, and ensure no visible dirt or dust.
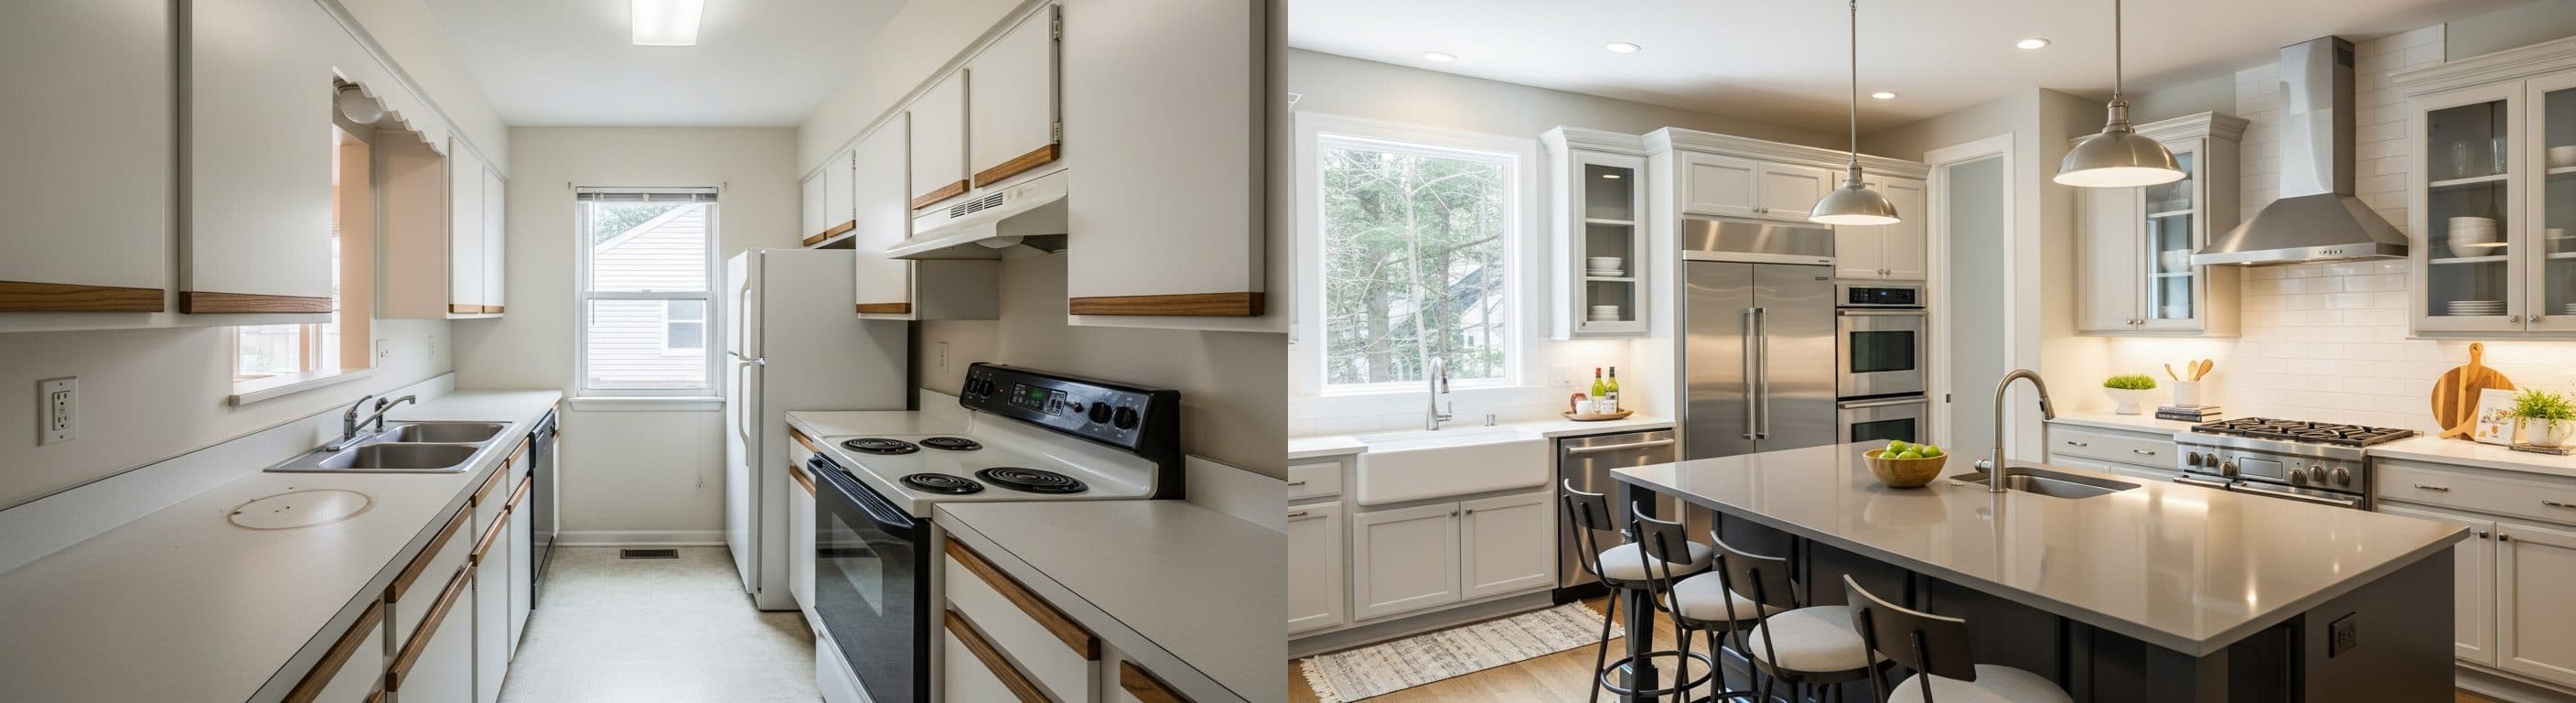
  • Focus on kitchens and bathrooms, as these areas are critical for buyer appeal.

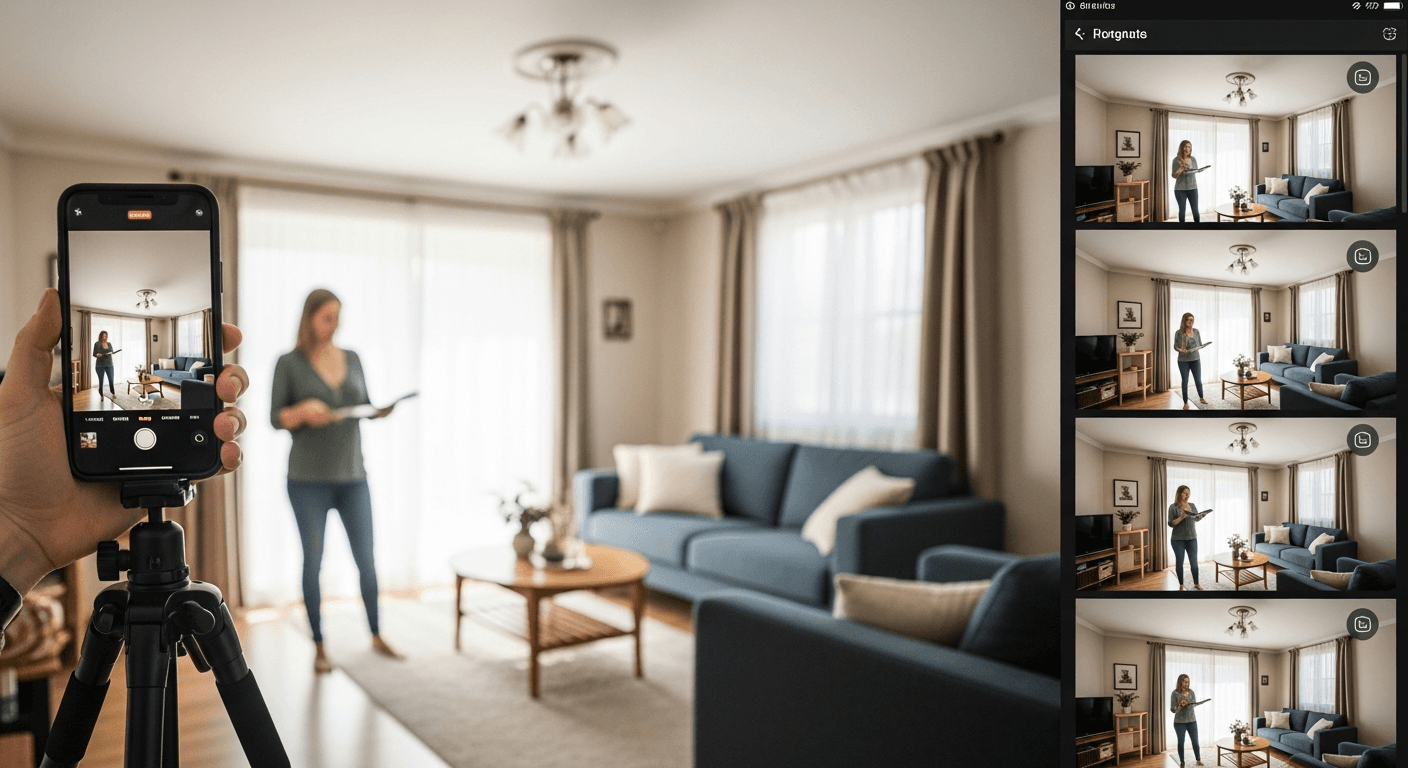
Budget-Friendly Tools for DIY Photography

Living Room: before vs after virtual staging
Invest in a wide-angle lens or use smartphone apps for better room perspectives on a budget. Common objection: 'I don't have professional equipment' – Quick win: Use free editing apps like Snapseed for enhancements. Photography Tips for Selling Your Home
ToolCostBenefit
Smartphone TripodLowStable shots
Wide-Angle AppFreeWider views
Editing SoftwareFreeEnhance quality

Step-by-Step Real Estate Photography Checklist

Try HomestagingKI for free

Upload a room photo and get a staged version in minutes. No furniture logistics, no waiting.

Start free
Follow this detailed checklist to ensure your photos are optimized for listings. This DIY property photos tips guide is designed for private sellers and developers alike. Real Estate Photography Guide for Homeowners
  • Plan your shoot during golden hour for optimal lighting.
  • Stage rooms minimally with existing items; focus on neutral decor to appeal to broader audiences.
  • Photograph from corners to maximize space perception, a simple technique that requires no extra cost.
  • Capture key areas: exterior, living room, kitchen, bedrooms, bathrooms.
  • Edit photos to correct exposure and colors.
Address budget concerns: DIY photography can save hundreds compared to hiring pros, with checklists ensuring quality. Overcome objection of time constraints by breaking the checklist into quick 15-minute tasks per room. Real Estate Photography Tips

How Better Photos Reduce Time on Market

Common Mistakes to Avoid in Home Photography

Häufige Fehler bei Immobilienfotos include poor composition and ignoring virtual staging potential. Learn from Houzz's dos and don'ts. Photography Checklist for Selling Your Home
  • Avoid cluttered shots – declutter first.
  • Don't use flash; rely on natural light.
  • Steer clear of tilted horizons – use grid lines on your camera.
Quick wins for better house photos: Adjust angles and use virtual staging to enhance appeal, as discussed in BoxBrownie's tips.

Integrating Virtual Staging with DIY Photos

Kitchen: before vs after virtual staging

Before & After that gets clicks

Photorealistic virtual staging for agents and private sellers—optimized for portals and social ads.

See pricing
Virtual staging and photo quality impact is significant. Use tools like HomestagingKI to transform your DIY shots into professional listings, boosting perceived value.
For a virtual staging photography guide , ensure base photos are high-resolution and well-lit. This can lead to 20-30% higher offers.
AspectDIY TipVirtual Staging Benefit
LightingNatural lightEnhanced realism
DeclutteringRemove itemsDigital furniture addition
AnglesCorner shotsWider appeal
Real estate agent advice on homeowner photography often includes recommending virtual staging to reduce time on market with better photos.

Scaling Photography for Developers and Agents

For developers, standardized real estate photos ensure brand consistent property images. Scaling property photography processes can speed up real estate photography workflows.
Implement checklists to maintain quality across multiple listings, as per Inman's standardization guide.
  • Use templates for photo sequences.
  • Train teams on DIY tips.
  • Incorporate virtual staging for consistency.

Speed Up Your Real Estate Photography Workflow

FAQs on Real Estate Photography for Homeowners

Need better photos for your listing?

Convert empty rooms into warm, modern interiors. Increase engagement and reduce time on market.

Generate now

FAQ

What is the best time to take real estate photos?
During the day with natural light, ideally golden hour.
How can I improve my DIY property photos on a budget?
Use free apps and follow a checklist for quick wins.
Does virtual staging really help?
Yes, it can increase offers by 20-30%.

Conclusion: Elevate Your Listings with This Checklist

Bedroom: before vs after virtual staging
By following this real estate photography checklist for homeowners, you can significantly enhance your listing's appeal. Remember, better photos lead to higher CTR, better leads, and faster sales. For professional touches, try HomestagingKI's virtual staging services.

Common Mistakes to Avoid in DIY Real Estate Photography

When homeowners take on the task of photographing their properties, it's easy to overlook certain pitfalls that can diminish the appeal of their listings. According to a Real Estate Photography Dos and Don'ts guide from Houzz, many sellers make errors that could be easily avoided with some forethought. This section will help you identify and steer clear of these issues to create a more compelling real estate photography checklist for homeowners.
  • Poor Lighting: Shooting in dim conditions without natural light or proper artificial sources can make rooms look uninviting.
  • Cluttered Spaces: Failing to declutter or stage rooms properly, leading to distracting elements in photos.
  • Bad Angles: Using awkward camera angles that distort room proportions or hide key features.
  • Over-Editing: Excessive photo editing that makes images look unnatural or misleading.
  • Ignoring Exterior Shots: Forgetting to capture high-quality photos of the home's exterior and curb appeal.
  • Low Resolution: Using a smartphone without optimizing settings, resulting in blurry or low-quality images.
  • Inconsistent Style: Mixing vertical and horizontal shots without a cohesive approach.
Avoiding these mistakes can significantly improve listing CTR through photography , as highlighted in Zillow's study on how photos impact home sales. By focusing on clean, well-lit, and professionally styled shots, you'll enhance the overall quality of your property photos.

Advanced DIY Property Photography Tips for Better ROI

Once you've mastered the basics, incorporating advanced techniques can further elevate your photos and improve listing photos for better ROI. Forbes Real Estate Council emphasizes the return on investment from high-quality images, which can lead to faster sales and higher offers.
Start by investing in simple tools like a tripod for stability and wide-angle lenses for capturing more space. Experiment with HDR (High Dynamic Range) photography to balance lighting in challenging environments. Additionally, consider the timing of your shoots—golden hour lighting can add a warm, inviting glow to exterior shots.
These tips align with advice from DIY Real Estate Photography Tips for Homeowners by Inman, helping you reduce time on market with better photos and increase buyer interest.

Integrating Virtual Staging with Your Photography

Virtual staging can transform empty or outdated spaces into visually appealing ones without physical changes. As per the Impact of Photos on Time on Market article from Virtual Staging, combining this with quality photography can drastically shorten selling times.
  • Choose Reputable Services: Opt for platforms that offer realistic virtual furniture placement.
  • Match Styles: Ensure virtual elements complement the home's actual architecture and decor.
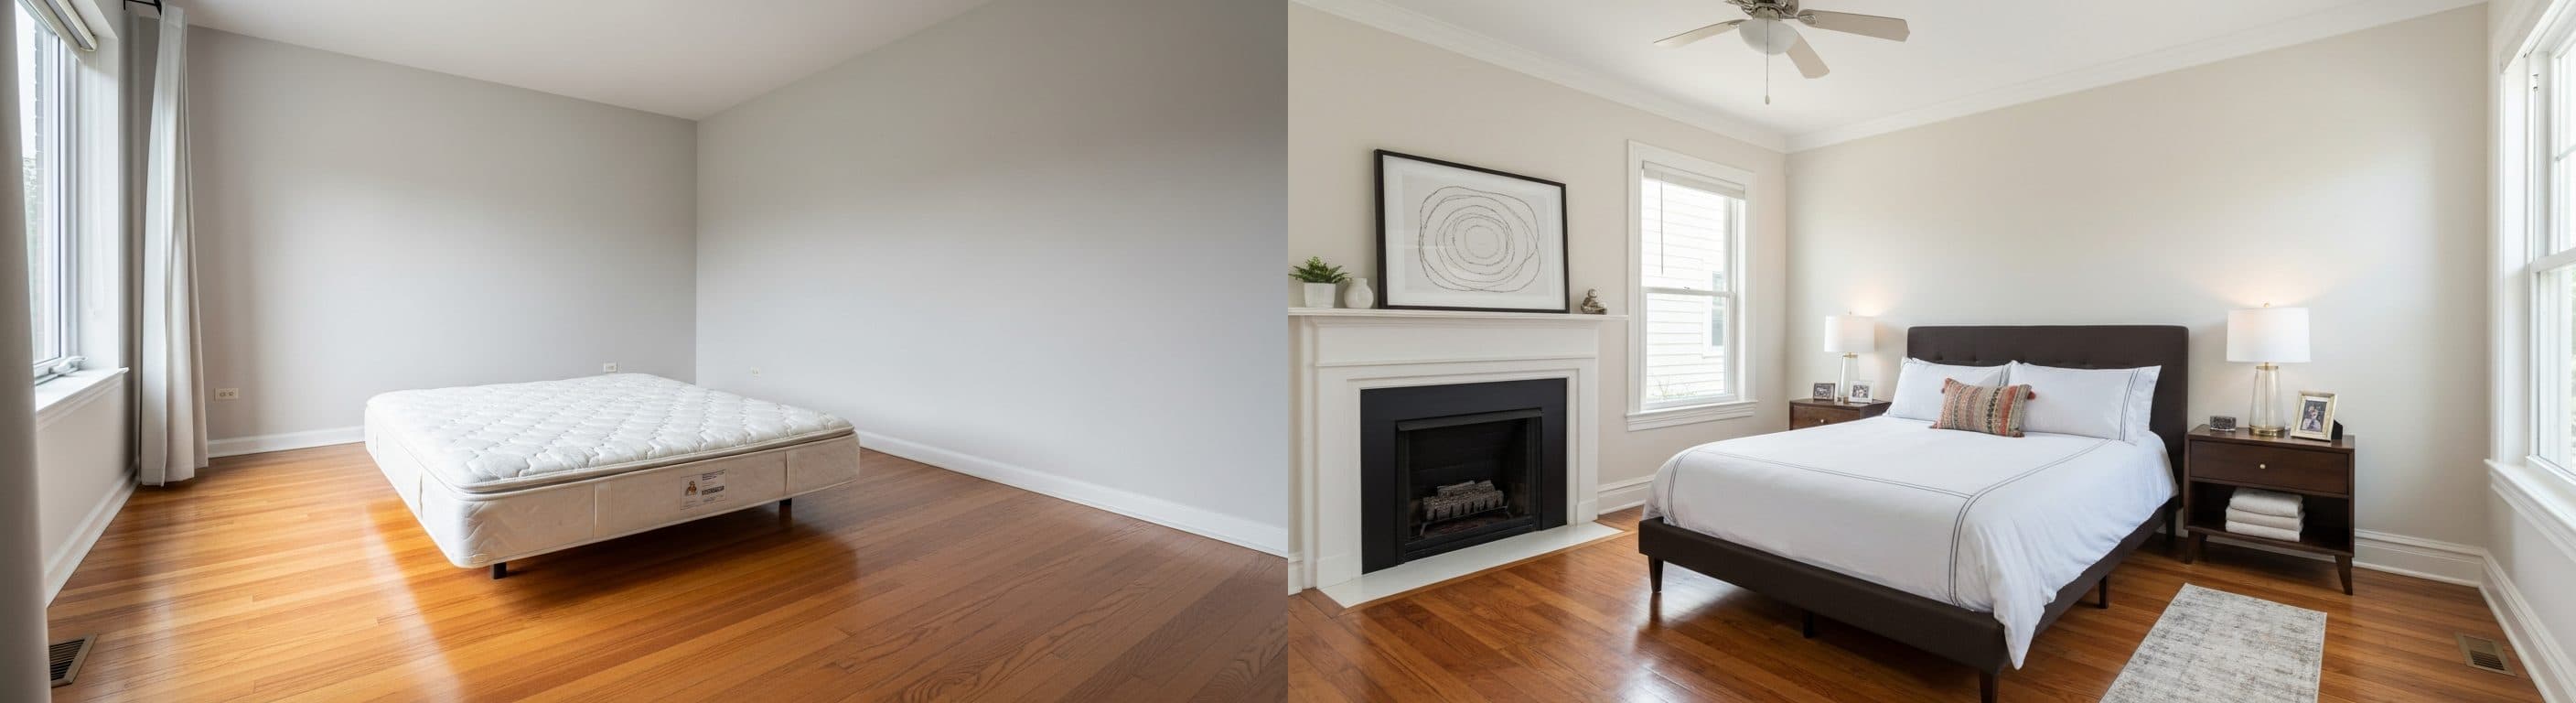
  • Highlight Key Rooms: Focus on living areas, kitchens, and bedrooms for maximum impact.
  • Compare Before and After: Use side-by-side images to show transformations in listings.
  • Budget Considerations: Virtual staging is often more affordable than traditional staging.
This approach not only enhances photo quality but also helps in virtual staging and photo quality impact , according to Redfin's study. Homeowners can achieve a polished look that appeals to a broader audience.

Budget-Friendly Virtual Staging Tips

For those on a tight budget, DIY virtual staging apps can be a game-changer. Resources like DIY Photography Tips for Real Estate Listings from BoxBrownie provide insights into affordable tools that integrate seamlessly with your DIY property photos tips.

Scaling Your Property Photography Process

If you're selling multiple properties or assisting others, standardizing your photography process is key. The NAR Report on Real Estate Photography suggests creating a repeatable checklist to maintain consistency and quality across listings.

D

e

T

r

U

s

T

r

I

t

By scaling efficiently, you can ensure brand consistent property images and enhance lead quality in real estate listings , as discussed in Real Trends' article on photography's impact on ROI.

Incorporating these strategies into your routine will not only speed up the selling process but also maximize your property's market potential. Remember, high-quality photos are a small investment with big returns in the competitive real estate market.

Common Mistakes to Avoid in DIY Real Estate Photography

Many homeowners underestimate the importance of high-quality photos when listing their property. According to a study by Zillow, poor photography can significantly reduce buyer interest. In this section, we'll cover frequent errors and how to sidestep them for better DIY property photos tips.
  • Using low-light conditions without proper adjustments, leading to grainy images.
  • Including clutter or personal items that distract from the home's features.
  • Shooting at awkward angles that distort room proportions.
  • Forgetting to clean surfaces, resulting in visible dust or smudges.
  • Over-editing photos, which can make them look unnatural and untrustworthy.
Avoiding these pitfalls can greatly improve listing photos for better ROI. As noted in the Redfin study on real estate photos, homes with professional-looking images sell faster and at higher prices.

Room-by-Room Checklist for Homeowner Real Estate Photo Guide

To create a comprehensive homeowner real estate photo guide , focus on capturing each space at its best. This standardized approach ensures brand consistent property images across your listing. Start by decluttering and staging each room simply.
RoomKey Photography TipsCommon Errors to Avoid
Living RoomUse wide-angle shots to show layout; natural light from windows; arrange furniture neatly.Dark shadows from poor lighting; including TVs or electronics that date the space.
KitchenHighlight countertops and appliances; clean all surfaces; shoot from multiple angles.Dirty dishes in sink; cluttered counters with small appliances.
BedroomFocus on bed as centerpiece; use neutral bedding; capture closet space if spacious.Personal items like clothes on floor; unmade beds.
BathroomEmphasize cleanliness; mirror shots to show depth; remove toiletries.Water spots on fixtures; towels hanging haphazardly.
ExteriorShoot during golden hour; include curb appeal elements like landscaping.Cars in driveway; trash bins visible.
Implementing this home staging photo checklist can reduce time on market with better photos. Insights from NAR's report emphasize that detailed room photos increase buyer engagement.

The Impact of Virtual Staging and Photo Quality

Virtual staging enhances empty spaces digitally, making them more appealing. This technique, combined with high-quality photography, can increase listing CTR through photography. A BoxBrownie article discusses how it reduces time on market.
  • Choose reputable virtual staging services for realistic renders.
  • Ensure staged photos match the actual property layout.
  • Combine with your DIY shots for a polished listing.
  • Use it sparingly to avoid misleading buyers.
  • Test different styles to see what resonates with your target audience.
Moreover, virtual staging impacts enhance lead quality in real estate listings by attracting serious buyers. As per Forbes' analysis, the ROI is substantial.

Quick Wins for Budget-Friendly Photo Improvements

For those on a budget, simple tweaks can yield big results. Follow budgetfreundliche Fototipps für Verkäufer like using smartphone apps for editing. The Inman DIY tips suggest natural lighting and stable shots.
Incorporate quick wins für bessere Hausfotos such as tripod use and horizon leveling. This aligns with advice from Realtor.com's checklist for sellers.
Finally, understanding häufige Fehler bei Immobilienfotos helps prevent issues. Resources like Houzz's dos and don'ts provide practical guidance to elevate your photography game and sell your home faster.

Sources